Self-replicating machines
Warning: This documentation is out of date and does not describe the behavior of the latest major version 4, which implements a new model. An up-to-date documentation can be found in the program help.
Abstract
There are several ways to create self-replicating structures. In this article, machines with the ability to self-replicate by inspection will be described. On the one hand they need a mechanism to read out their own structure and internal states and, on the other hand, they also require an apparatus to replicate them.
Cell skeleton
We build our self-replicating machine as a simple loop. A more complicated topology is of course also conceivable, but not relevant for our rather minimal example. In general, replication costs energy and since energy conservation must be satisfied in ALIEN, in addition to the ability to self-replicate, we also need simple movement and digestion functionality so that sufficient energy can be provided.
A possible basic framework is shown above. At the front (right) is a cell with attack capabilities and at the sides are muscle units to accelerate in the respective direction. For simplicity, we will implement a straight ahead movement pattern. At the back (left) we attach a scanner cell to read out the inner structure and a constructor cell to rebuild the extracted information. The challenge here is that we have a variety of cell types and we need to provide them with the appropriate information using the computational cells.
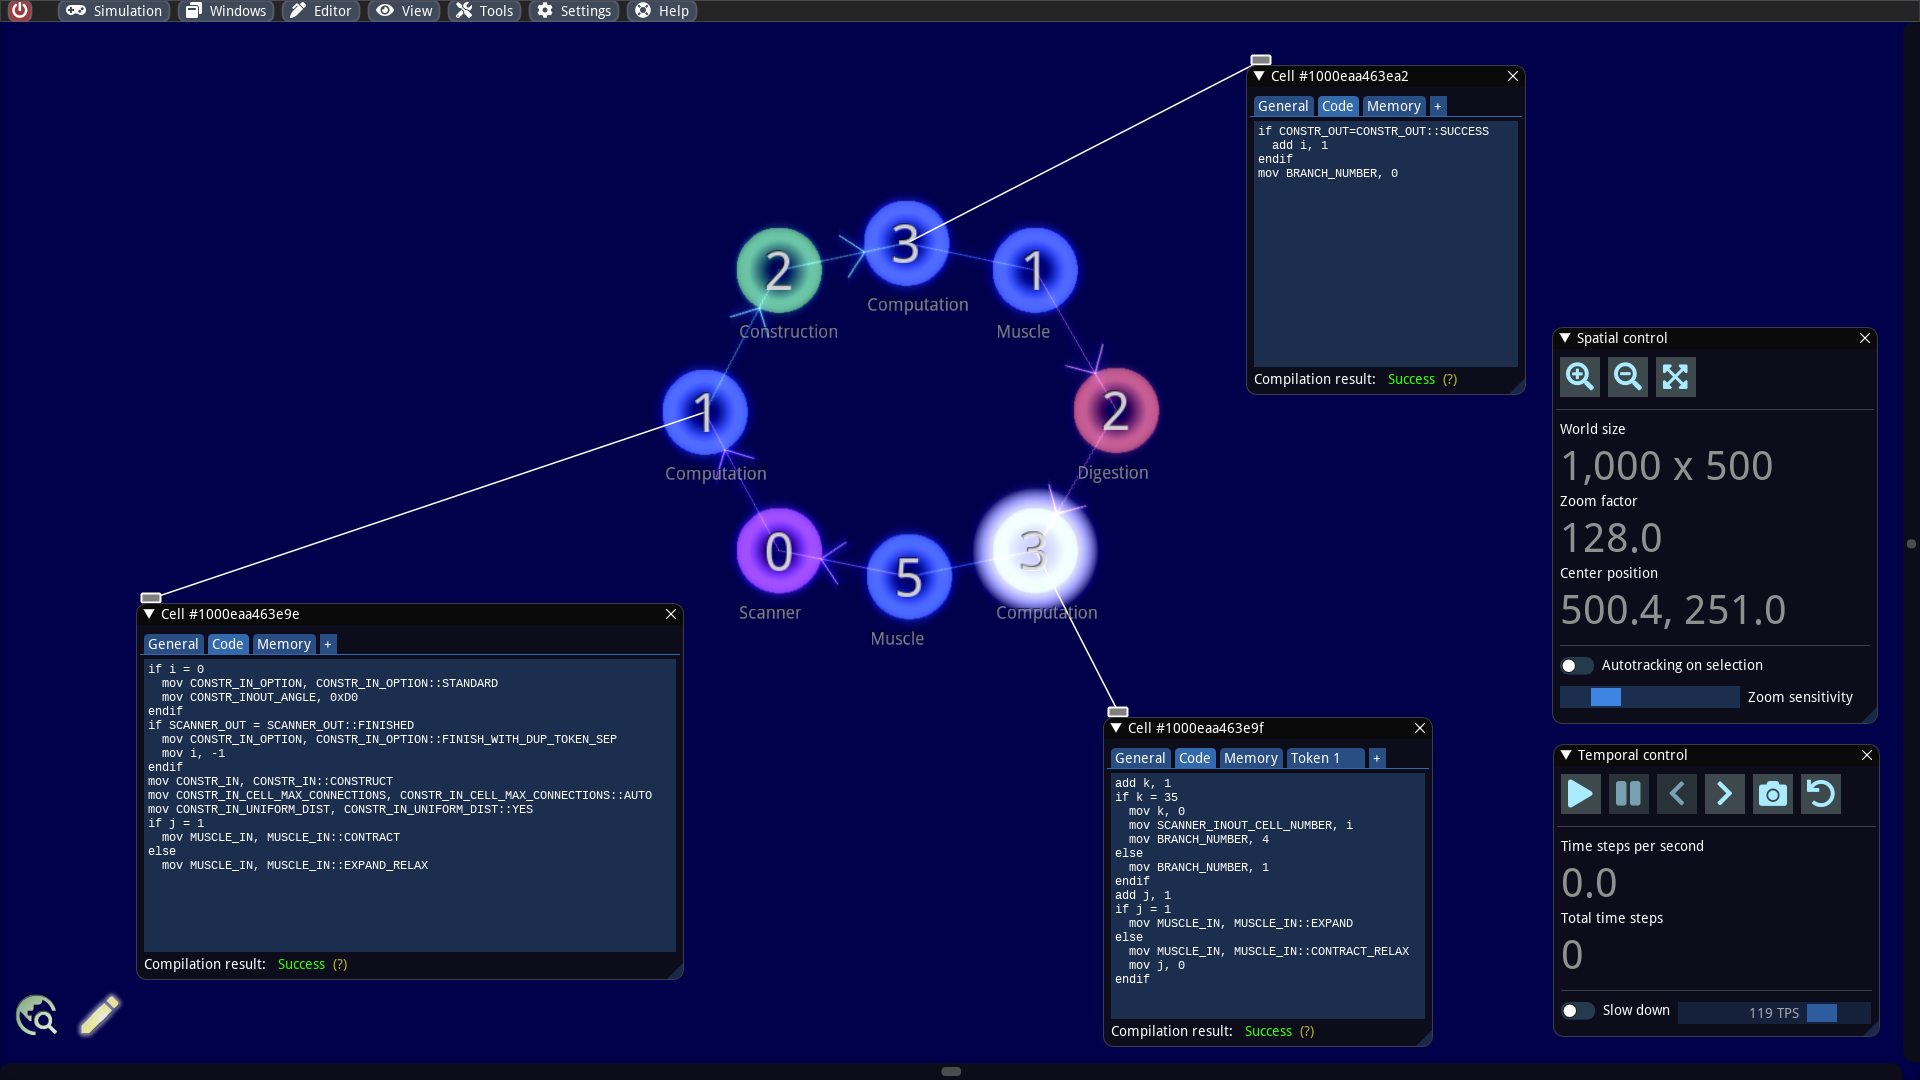
In the ALIEN editor, our self-replicator then looks like this:
The different cell colors are only used here to highlight certain parts. In the following, we will first explain the two new cell types (Scanner and Constructor) and then discuss the data supply.
Working principle of a scanner cell
A scanner cell can read the internal state and the angles and distances of the reference configuration to another cell in the cell cluster. For this purpose, the scanner cell numbers all the cells in the cluster starting from itself according to the specified order. If one wants to read out a cell in the cluster, one has to tell the scanner cell the corresponding number. Cells are numbered in a spiraling counterclockwise fashion around the scanner cell. A few examples illustrate the numbering algorithm:
In this example, the scanner cell is on the blue token that comes from the left neighboring cell. The scanner cell itself is numbered with 0 and the cell where the token comes from with 1. Afterwards the further cells are numbered counterclockwise in ascending order.
The numbering shown here has nothing to do with the token branch numbers of the cells.
However, in this example, the cell cluster is not completely covered by the numbering algorithm,
For our replicator, the resulting numbering of the cells is relatively simple. With the help of this (relative) numbering, the scanner cell can now be provided with a number indicating for which cell in the cluster the information should be read out.
Let us assume we want to read the cell with the number n. The scanner cell then provides the following information as output:
The reference distance of cell
nfrom celln-1.The reference angle between the two cell connections of cells
nandn-1and cellsnandn+1.Internal state of cell
nincluding energy, maximal connection, branch number, color, cell specialization und cell memories.
It should be noted that only the cell connection information to the predecessor and successor cells are retrieved. Other possible cell connections are not read out. We will see in the next section that this information is nevertheless usually sufficient to rebuild even more complex topologies than simple loops.
For example, suppose that we want to scan the cell with number 3 in our replicator above. We would then obtain the (reference) distance d and angle α as follows:
There are a few special cases:
When reading out the cell with number 0, no distance and angle information are returned.
The cell with the largest number is read, i.e. there is no successor cell: In this case, no angle information is supplied and the reaching of the end is reported.
If the number of the cell to be read in does not exist, a reaching of the end is also returned.
Working principle of a construction cell
A construction cell is, in a sense, the counterpart to a scanner cell. It can use the information provided by the scanner cell to build a replica of the scanned cell. It is, of course, also possible to provide completely new construction information through preceding computational cells. A construction cell can only create one new cell per invocation at most. Consequently, in order to create a complete cell cluster including its connections, the construction cell must be called several times. Such a cluster construction process follows a 3 stage pattern, which we will discuss below.
1. Create a construction site
In this case, we assume that we have not yet created a cell or, more precisely, none of the created cells is still connected to the construction cell. The goal is here to create a new adjacent cell which will be connected to the construction cell (if desired). This requires an angle specification and the internal state of the new cell. The exact spatial position then results as follows:
First of all, two successive cell connections of the construction cell are searched for, which have the largest angle to each other. The new cell is then created with the specified angle in this area (see illustration below).
The distance from the construction cell is a fixed value and cannot be adjusted.
In the above illustration, the blue construction cell is already connected to 3 other cells. The angles between the connections there are labeled as α, β and γ, of which α is the largest. Therefore, the new cell is created in the neighborhood to the angle α. The angle δ is passed to the construction cell and thus defines the exact angle position.
The above angle calculation refers to the reference angles and not to the actual spatial angles.
In order for the newly created cell to be recognized as a construction site in the further process, it is marked in a certain way. For this purpose, the block token flag is on that cell. It also causes that this cell cannot accept tokens.
2. Extend the construction site
Here, it is assumed that a construction site already exists, i.e., that at least one cell connected to the construction cell has the block token flag set. During the process, the direct connection between the construction cell and the cell representing the construction site will be deleted and block token flag disabled. Then, a new cell (with block token flag set) will be created between the construction cell and the construction site. The angle to the construction site is preserved and denoted by δ_old in the illustration (and identical to δ from the 1st step).
The situation with the angle between the two connections of the new cell is a bit more complicated. The actual spatial angle is 180°, but the reference angle is set to δ, which is the angle passed to the construction cell beforehand. The difference between the reference angle and the actual spatial angle results in forces on the cells that fold them to the desired positions after a few time steps.
The distance between the new cell and the cell of the construction site is denoted by d and handed over to the construction cell. Here, the actual spatial distance equals the reference distance.
If there are other cells in the immediate vicinity of the newly created cell, they will be connected to each other. In this way, a more complex cell cluster can be reproduced. The reference angles and distances required for the further connections are calculated from the spatial conditions and cannot be handed over. However, it is possible to project the reference angles to an integer multiple of, for example, 60 or 90 degrees in order to be able to somehow control the angles to the additional connections.
3. Finish the construction site
The second step is repeated until the construction site is completed except for the last cell. But during the creation of the last cell, the construction site needs to be separated from the construction cell and thus will form a new cell cluster. Consequently, the only difference to step 2 is that the created cell will not be connected to the construction cell and that the block token flag remains disabled.
In all three steps optionally also a token can be generated on the new cell. The token memory can not be specified directly. But one has the choice between a new token with empty memory and one with a copy of the memory of the token that invokes the constructor cell.
Implementation
We will examine the control of the scanner and constructor cells using our example of the self-replicating machine from the beginning. Let us start with the computing cell at the bottom right. It contains the following cell code:
Line 1 - 8:
kis a variable used to introduce additional delays in the construction process, because after a new cell is created, it needs some time to fold into the correct position.kis incremented until35and then set to0. The value35was determined by experiments but larger values should also do. During the increment we force the token not to jump to the next cell but to the previous cell by setting theBRANCH_NUMBERappropriately. The previous cell is a digestion cell and provides our replicator with energy. Only whenkis equal to35we let the token jump to the successor cell in the ring and specify inSCANNER_INOUT_CELL_NUMBERthe cell number we want to scan and replicate next. The variableisimply serves here as a pointer to the current cell we want to replicate.Line 9 - 15: Here one finds a simple muscle controller with a counter variable
jthat leads to periodic expansion and contraction and generates an impulse. We have already seen such programming in the swarmbot example.
Of particular interest to us is the programming of the lower left computational cell:
Line 1 - 4: If we start the construction process, i.e., if
iis0, we set the construction option here withCONSTR_IN_OPTION::STANDARD(we will discuss the alternatives below) and the initial angle of our construction site. The angles are always specified with respect to the direction of the token movement. The value0xD0corresponds to approx.-67.5degrees.Line 5 - 8: We check if we have already scanned the last cell (alternatively, we could also check that
iequals8). If this is the case, we instruct the constructor to detach the cluster after creating the new cell and create a token on it. Furthermore, our counteriis reset to-1because the last cell still needs to be constructed.Line 9: In this line,
CONSTR_IN::CONSTRUCTwill later inform the constructor that we want to create a new cell. The only alternative value isCONSTR_IN::DO_NOTHING.Line 10: We instruct the constructor to automatically adjust the maximum number of cell connections to the cells. This always ensures that the construction process does not fail because the cells can no longer form new connections.
Line 11: We set a uniform cell distance for all new cell connections.
Line 12 - 15: This is where the control for the second muscle is located and also causes periodic contraction and expansion while producing an impulse.
For completeness, the different values for CONSTR_IN_OPTION are explained below:
CONSTR_IN_OPTION::STANDARD: Option for constructing a new cell without a token and without separation.CONSTR_IN_OPTION::CREATE_EMPTY_TOKEN: Option for constructing a new cell with an empty token (memory is filled with zeros) and without separation.CONSTR_IN_OPTION::CREATE_DUP_TOKEN: Option for constructing a new cell with a duplicated token (memory is copied from token on constructor cell) and without separation.CONSTR_IN_OPTION::FINISH_NO_SEP: With this option, a new cell should be created and the site should be closed without separation. This is done by unsetting the block token flag on the new cell.CONSTR_IN_OPTION::FINISH_WITH_SEP: Option for constructing a new cell without a token but with separation.CONSTR_IN_OPTION::FINISH_WITH_EMPTY_TOKEN_SEP: Option for constructing a new cell with an empty token and with separation.CONSTR_IN_OPTION::FINISH_WITH_DUP_TOKEN_SEP: Option for constructing a new cell with a duplicated token and with separation.
Finally, we inspect our computing cell on the top:
Line 1 checks whether the last construction process was successful. In this case, i is incremented by one in line 2 and thus points to the next cell. In general, CONSTR_OUT can take the following values:
CONSTR_OUT::SUCCESS: A new cell has been created.CONSTR_OUT::ERROR_NO_ENERGY: The token that has invoked the constructor cell did not provide enough energy to create a cell (optionally with token).CONSTR_OUT::ERROR_CONNECTION: No cell could be created because either the constructor or the future cell did not allow for additional connections.CONSTR_OUT::ERROR_LOCK: Another token has blocked the construction process.CONSTR_OUT::ERROR_DIST: A cell could not be created because there was not enough space at the required distance.
It should be noted that the scanner cell stores the internal state of the scanned cell (specialization, memory, etc. ), angle and distance at the same location in the token memory where the constructor reads them out. Therefore, we do not have to copy that information.
Our self-replicator is now ready! The finished example can also be found as a pattern under ./examples/patterns/replicators/Loop.sim. To test the machine, please refer to the article on Evolution experiments.
Last updated